Battery Wont Charge (iOS, Android)
Battery Won't Charge (iOS, Android)
Issue [Battery Wont Charge (iOS, Android) ]
Devices [Android, iOS]
Suggested Resolutions [See Steps Below]
iOS:
Step 1: Check Your Charging Cable and USB Adapter for Signs of Damage
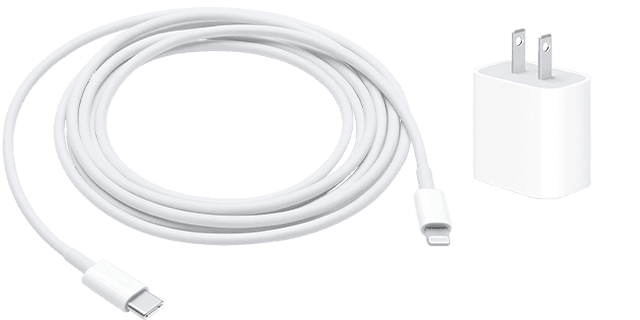
Step 2: Use a Wall Power Outlet and Check for Firm Connections Between Your Charging Cable, USB Wall Adapter, and Wall Outlet or AC Power Cable, or Try a Different Outlet
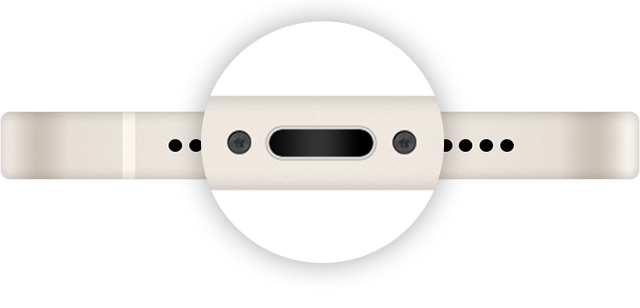
Step 3: Remove any Debris from the Charging Port on the Bottom of Your Device
Step 4: Force Restart Your Device
- iPhone 8 or later and iPhone SE (2nd generation): Press and quickly release the volume up button. Press and quickly release the volume down button. Press and hold the side button until the Apple logo appears.
- iPhone 7, iPhone 7 Plus, and iPod touch (7th generation): Press and hold both the side (or top) button and the volume down button until the Apple logo appears.
- iPhone 6s or earlier, iPhone SE (1st generation), and iPod touch (6th generation) or earlier: Press and hold both the side (or top) button and the Home button until the Apple logo appears.
Force Restarting an iPad Without a Home Button
Press and quickly release the volume button nearest to the top button.
Press and quickly release the volume button farthest from the top button.
Press and hold the top button.
When the Apple logo appears, release the top button.


Step 5: Make sure you have the Latest Version of iOS
Step 6: Contact Apple Support if Problem Persists
Android:
Step 1: Make sure you don't have a Faulty Cable or Charger
Although most phone chargers and charging cables look similar, there can be a huge difference between their quality and charging speed. It is always recommended to use an official Samsung charging cable as these have been specially made for your device and are designed to maximise battery life.
Using an unofficial charger can cause damage to your phone. Official have the correct voltage for your device, whereas alternative chargers may operate to a different voltage. Check to make sure that you are not using counterfeit accessories.
Step 2: Try a Different Cable and Plug
Step 3: Try a Different Power Source
Step 4: Run a Test Using Samsung Members
You can use Samsung Members to run a test on your battery and charging port. This will check for any issues. Watch the video and follow the steps below to find out how to run a test.


Step 5: Clean the Charging Port
Step 6: Check for Water and Moisture
Your device will not charge if it detects water or moisture in the USB port. This is a security measure to protect the device from damage and corrosion. If your device has detected water in the charging port, it will sometimes display a waterdrop icon on the screen above the charging port. If you see the waterdrop icon, make sure that your device is turned off while it dries.
Please note: It is not always obvious when water has entered your phone. Just exposing your phone to a humid environment can cause water to enter the phone, even if there is no visible sign.
Most moisture will evaporate by itself within a few hours, but you can also try blowing gently on the port or exposing it to cool dry air. If the waterdrop icon has still not disappeared but you are sure the charging port is dry, try turning your device off and on again.
If the icon remains after this and your device still has power, clear the cache for USB:


Once you've cleared your cache and data, try charging your phone again to see if this has resolved your issue.
Step 7: Reboot Your Device
If your phone still has power remaining, try a soft reboot. This will allow the device to reset its temporary memory and will help you determine if the problem is software related. To perform the reboot press and hold the Power and Volume Down keys until the device restarts.

Please note: The key combinations may differ slightly depending on the model of your device.
Step 8: Update Your Software
Software updates are regularly released by Samsung and can solve a range of device software problems. If your phone still has power follow the steps below:


Your device will check for available updates. If there is an update for your device, you will be asked to download and install it. If there are no updates available your device will display that 'Your software is up to date.'
Step 9: Try a Wireless Charger
If you think the problem is related to wired charging and you have a wireless charging compatible device, try charging your device using a wireless charger. Make sure to remove any cases or covers first and lay the back of your device onto the wireless charger, making sure to line up the charging coils to establish the strongest possible connection.

Step 10: Run Your Phone in Safe Mode
Safe mode allows you to use your phone on its original interface without third-party applications. This means that any apps or downloads that may be affecting your phone can be isolated and prevented from causing issues, allowing you to identify problems easier. To find out more about how safe mode works read our article on how to start your galaxy device in safe mode.
To reboot your device in safe mode, take the following steps:


Step 11: Book a Repair
External Websites/Sources
Related Articles
Battery Won't Charge (Laptop/Desktop)
Issue [Battery Won't Charge (Laptop) ] Devices [Laptop, MacOS, Windows] Suggested Resolutions [See Steps Below] Windows 10: Step 1: Run Windows 10 Battery Diagnostics If your battery isn’t fully charging, the first thing you can try is the Battery ...Device Running Slow (Android)
Issue [Device Running Slow (Android)] Devices [Android] Suggested Resolutions [See Steps Below] Restart the device This will clear the memory and give everything a fresh start. A lot of the time, a restart will fix minor problems and speed things up. ...Device Running Slow (iOS)
Issue [Device Running Slow iOS] Devices [iOS] Suggested Resolutions [See Steps Below] Check your network conditions Many apps require an internet connection for their content and other functionality. If the network that you're connected to is ...Slow Internet
Issue [Slow Internet] Devices [Laptop, Desktop, iOS, Android] Suggested Resolutions [See Steps Below] General Steps (Applies to All Devices): Step 1: Run an Internet Speed Test There are a number of online speed tests (CNet Internet Speed Test is a ...Troubleshoot Network Issues
Issue [Troubleshoot Network Issues] Devices [Windows, MacOS, iOS, Android, Chrome OS] Suggested Resolutions [See Steps Below] Issues can arise at numerous points along the network. Before you start trying to troubleshoot any issue, you want to have a ...