Data Recovery (MacOS)
Issue [Data Recovery (MacOS) ]
Devices [MacOS, MacBook, Mac]
Suggested Resolutions [See Steps Below]
How to Choose the Right Way of Recovering Mac Files?
When deciding how to recover deleted files on Mac, you need to take into consideration the following factors:
| Factor | Description |
| 🧠 Your skills | There’s absolutely no shame in admitting that your computer skills are limited. If you don’t feel confident enough to use some of the more difficult methods described below, you can simply pick an easier one and retrieve deleted files on Mac just as reliably. For example Disk Drill is do-it-yourself data recovery software for Mac users of all levels. |
| 📉 The limitations of each method | All recovery methods have certain limitations that dictate when they can be used. You need to keep these limitations in mind to avoid wasting time on a file recovery method that has no chance of working. |
| ⌚ How much time you have | Some data recovery methods are more time consuming than others. While the difference tends to be fairly small, being able to recover lost files just a few minutes faster when you’re about to give an important presentation may be the difference between success and failure. |
Use the following comparison table of different recovery methods to pick the right one for you.
As you can see, you have quite a few options when it comes to recovering deleted files on Mac. Regardless of which option you pick, you should always make data recovery your top priority and avoid writing new data to the storage device on which the deleted files were located.
Option 1: Use Undo Command on Mac
- Approximate time to recover a file: 10 seconds
- Difficulty: Easy. You don’t need special knowledge to use this method.
- Limitations: Doesn’t work if you’ve already taken other actions or exited the application used to delete the file.
- Bulk recovery: Impossible. Because this recovery method for Mac can undelete only the last deleted file.
- Location and name of recovered files: Recovered files will appear in their original locations and have their original names.
When you delete the wrong file on Mac and notice your mistake right away, you can instantly recover it using the Undo command. As its name suggests, this command reverses the last completed action, and there are several ways to invoke it.
Step 1. Highlight the application that was used to delete the file (such as Finder).
Step 2. Open the Edit menu in the menu bar.
Step 3. Click Undo Move of “filename”.

Alternatively, you can press Command + Z on your keyboard to invoke the Undo command straight away. Just keep in mind that the correct application must be in focus for the Undo command to do what you intend it to do.
- Straightforward
- No learning curve whatsoever
- Works in all Mac applications
- Can recover only the last deleted file
- Must be used before exiting the application from which the file was deleted
Option 2: Recover Files from Trash on Mac
 Approximate time to recover a file: 1 minute
- Difficulty: Easy. You don’t need special knowledge to use this method.
- Limitations: Files can’t be recovered from Trash that has been emptied, which can happen either manually or automatically after 30 days.
- Bulk recovery: Possible. You can recover as many files at the same time as you want.
- Location and name of recovered files: Recovered files will appear in their original locations and have their original names, but you can also recover them to any other location.
When you delete a file on Mac, it usually (not always!) ends up in a special folder called Trash, where it stays until you manually/automatically empty Trash. While the file is in Trash, you can recover it to its original folder with a few simple clicks and know that the recovery will be 100% successful.
Step 1. Click the Trash icon in the Dock.
![]()
Step 2. Select your files (you can use the search bar if you remember the name of the file you want to recover).
Step 3. Right-click on any of the selected files and choose the Put Back option.
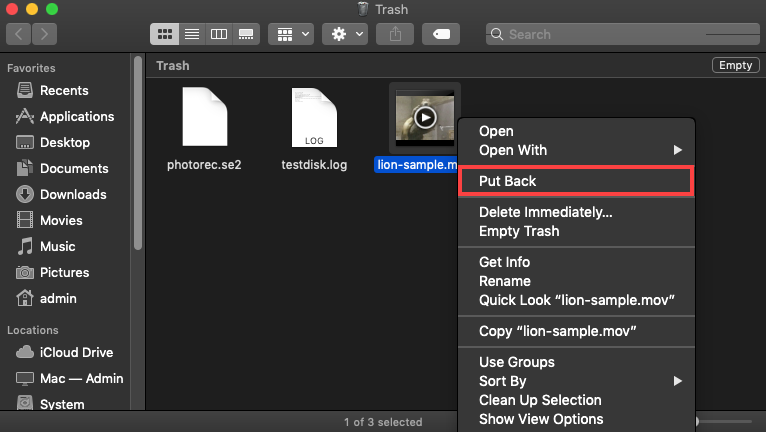
If you don’t want to recover the deleted files to their original folders, you can drag and drop them to any folder you wish.
- Takes less than a minute
- Lets you recover deleted files on Mac without software
- Makes it easy to find deleted files
- Restores files to the previous place
- Not all deleted files end up in Trash
- The auto-empty feature of Mac removes files from Trash after 30 days
Option 3: Recover Deleted Files Using Terminal
 Approximate time to recover a file: 3 minutes
- Difficulty: Hard. You need to know exactly which commands to use.
- Limitations: You have to know the exact name of the deleted file you want to recover.
- Bulk recovery: Impossible. With a single Terminal command, you can recover only one file.
- Location and name of recovered files: Recovered files will have their original names, but you must manually specify the recovery location.
On Mac, there are always several ways to accomplish the same thing, and you can use whichever you like the most. If you’ve always loved Macintosh computers because of their Unix roots and powerful command-line interface, you may like the idea of using Terminal to recover your files from Trash.
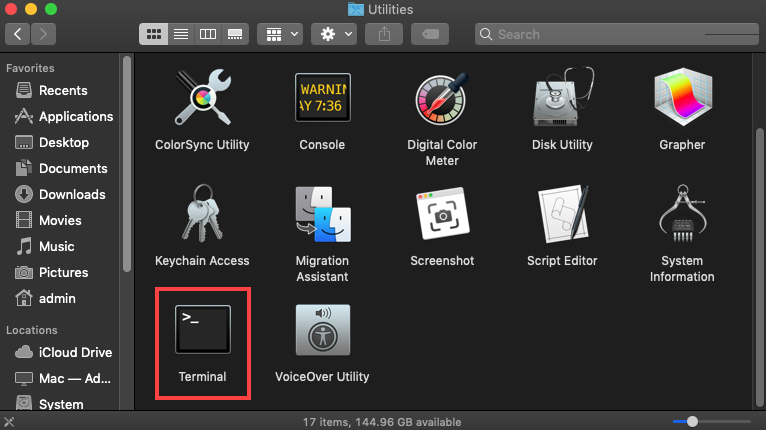
Step 1. Launch Terminal from /Applications/Utilities or using Spotlight.
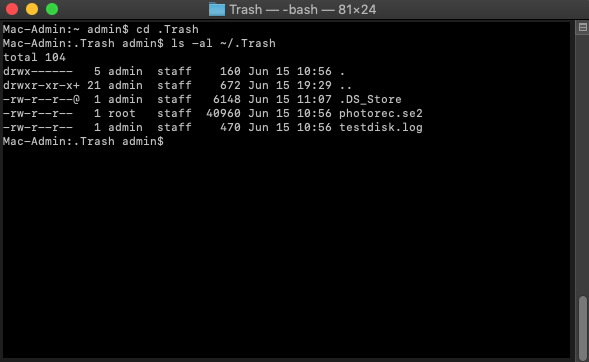
Step 2. Enter cd .Trash to navigate to the Trash folder.
Step 3. Enter ls -al ~/.Trash to view the content of the Trash folder.
Step 4. Enter mv filename ../ to move a specific file to your home folder (replace filename with the name of the file you want to recover).
Since Terminal commands are really just alternatives to the graphical user interface of Trash, they won’t help you recover Trash that you or your Mac has emptied.
- Potentially useful alternative to the graphical user interface of Trash
- Relatively quick method once you know what you’re doing.
- Intimidating
- Bulk recovery not supported
- You must know the exact name of the file you want to recover
- Can’t preview files before recovery.
Option 4: Recover Files from Backups
 Approximate time to recover a file: 10 minutes
- Difficulty: Normal. As long as you use a user-friendly backup tool, you should be able to recover your files without any major issues.
- Limitations: Works only if you had created a backup prior to losing your files. You have to remember where your files were stored.
- Bulk recovery: Possible. Virtually all backup tools can recover multiple deleted files at the same time.
- Location and name of recovered files: Recovered files will appear in their original locations and have their original names.
There are multiple categories of backup tools that can be used to reliably recover deleted files on Mac. All Macs with macOS 10.5 or newer are equipped with an incremental backup tool called Time Machine, which allows users to restore the entire operating system or specific files from a local backup stored on a dedicated backup drive. Starting from macOS 11 Big Sur Time Machine is able to make “faster, more compact, and more reliable backups”. This is how you can restore deleted files from a Time Machine backup:
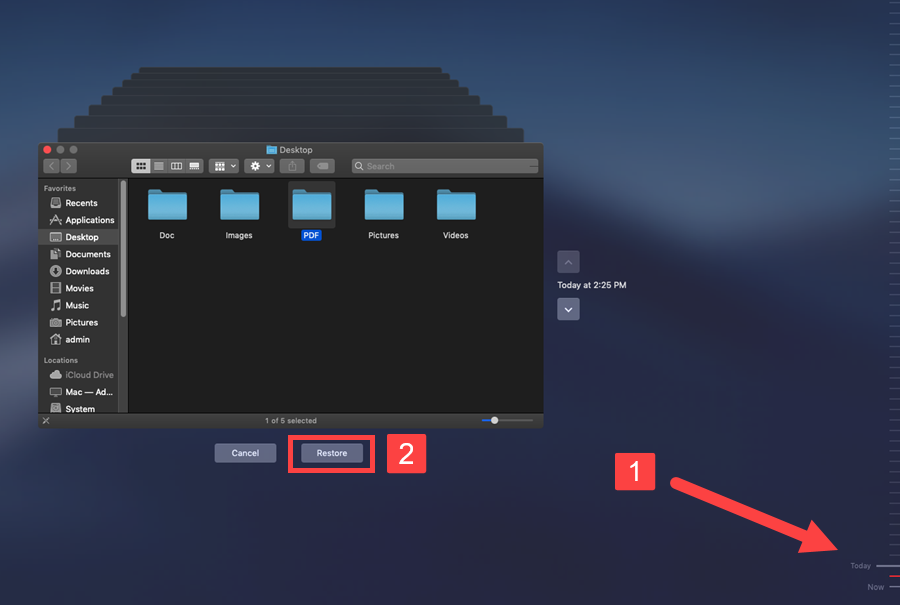
Step 1. Open the folder that contained the deleted files using Finder.
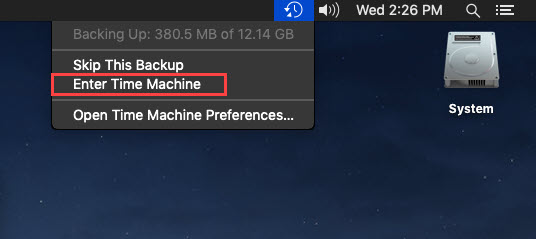
Step 2. Click the Time Machine icon located in the Menu Bar and choose Enter Time Machine.
Step 3. Select the files you want to recover. Use the timeline on the right edge of the screen to find the most recent version of your files.
Step 4. Click Restore to restore the selected files.
Some Mac users may prefer the convenience of cloud backup solutions like Google Drive, iCloud, or Dropbox, whose biggest advantage is the fact that you can access them from anywhere.
Regardless of which backup tool you prefer, you will be able to recover your lost files with it only if you had created a backup beforehand. If you don’t have an up-to-date backup to recover from, you need to try some other method.
- 100% reliable
- All new Macs ship with a great backup tool pre-installed
- Can be used to recover data after physical damage
- Works only if you have an up-to-date backup of your data
- Search takes time
Option 5: Try Mac Data Recovery Software
- Approximate time to recover a file: 7 minutes
- Difficulty: Normal. No special knowledge or skills are necessary to recover deleted Trash on Mac with modern data recovery software.
- Limitations: Even data recovery software can’t recover files that have been overwritten by new data.
- Bulk recovery: Possible. Data recovery software solutions typically allow their users to recover multiple files at the same time.
- Location and name of recovered files: Recovered files will have their original names, but you must manually specify the recovery location.
Data recovery for Mac can also be performed using specialized recovery software applications. Such applications cost anywhere from $0 to several hundred dollars, and they target casual home users and professionals alike.
Unlike the methods we’ve described so far, recovery software applications can recover emptied Trash on Mac and get back permanently deleted files that were never in Trash in the first place. Some recovery software applications, especially those that cost money, include various file protection and backup features, which you can use to avoid data loss in the future.
Let’s take a closer look at how to recover deleted files on Mac OS X and macOS with one free file recovery software application and one paid recovery software application.
Available for macOS 10.15.7–13.x.
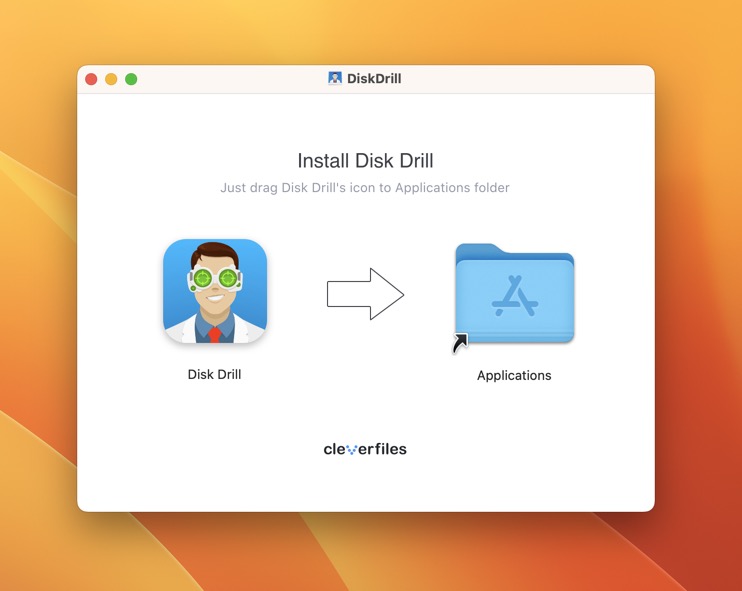
Step 1. Download and install Disk Drill for Mac.
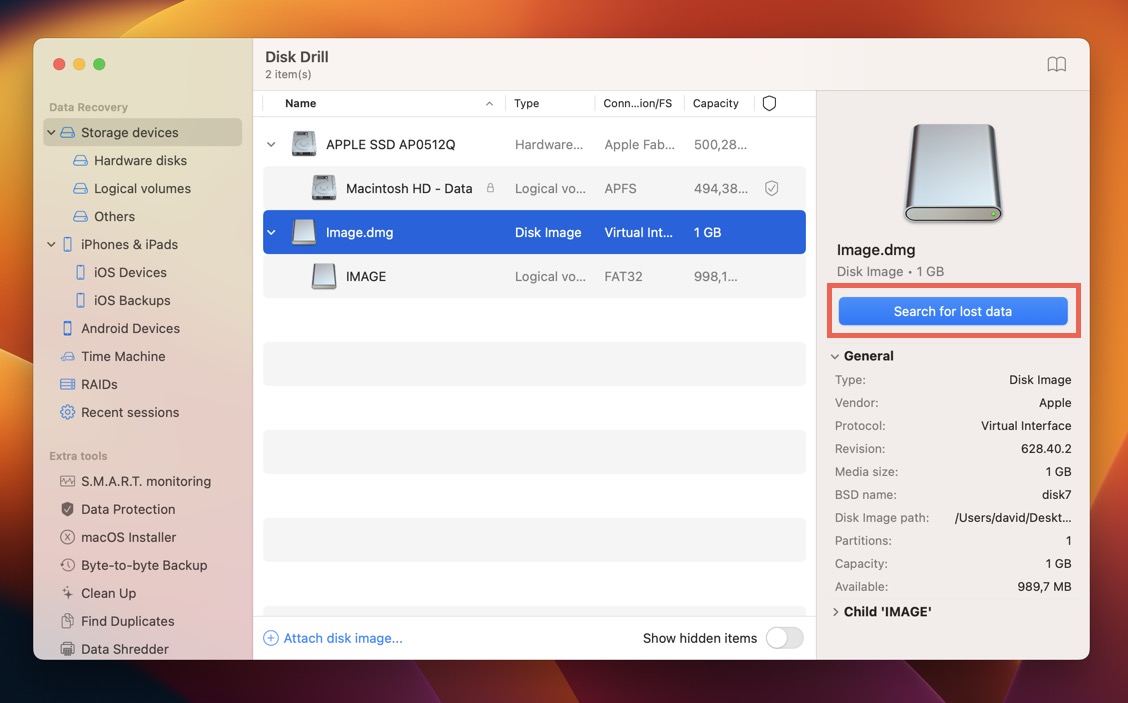
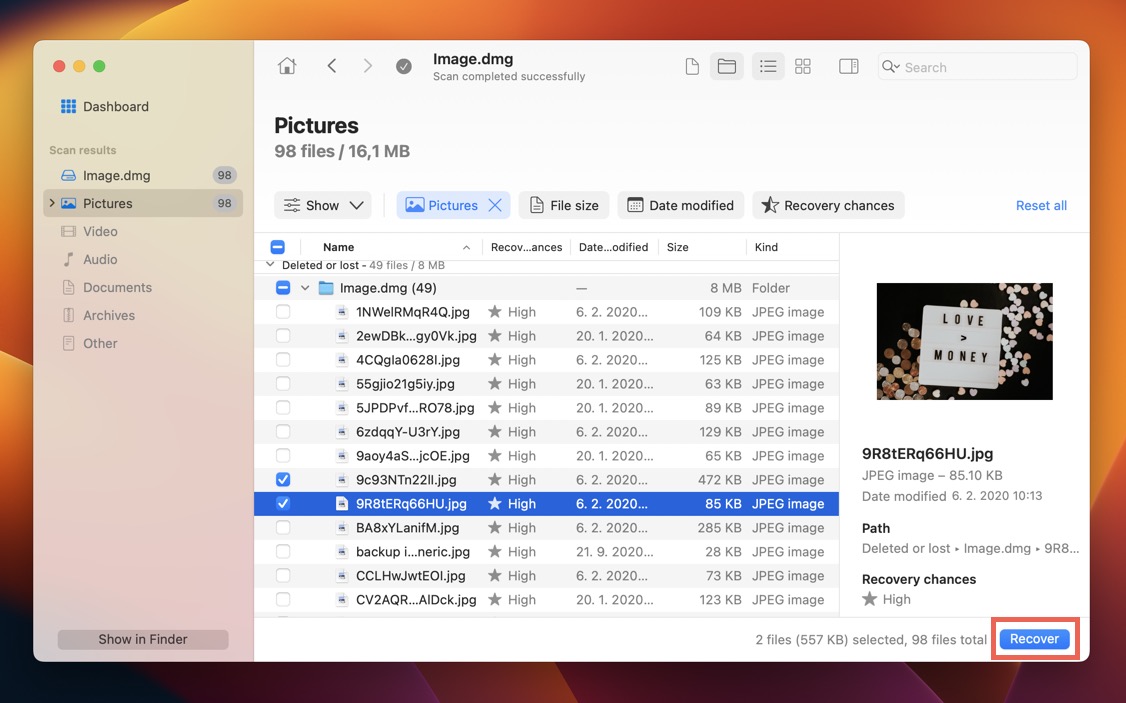
Step 2. Launch Disk Drill, select the drive where your files were stored, and click Search for lost data.
Step 3. Wait for the scan to finish, with the help of Disk Drill’s scan results filters and preview feature, select all files that you want to recover, and then click the Recover button.
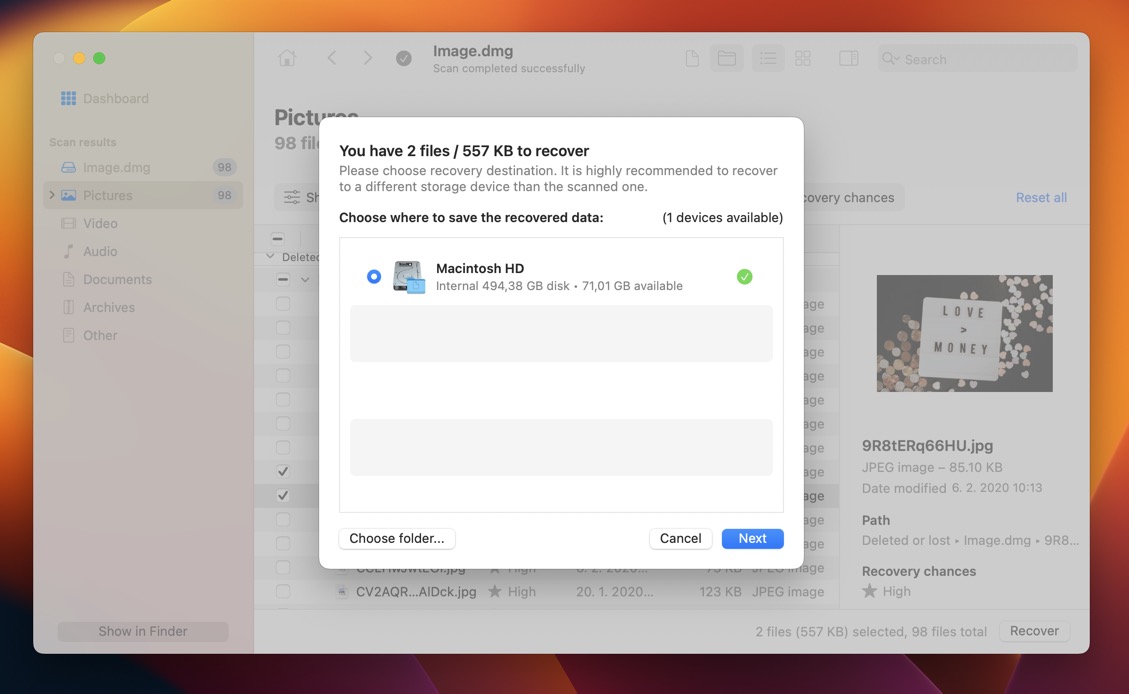
Step 4. Specify the recovery destination and click Next to begin the recovery process.
Available for Mac OS X 10.14 or later.
TestDisk is a freeware disk repair and data recovery tool for macOS that also supports Windows, Linux, and Unix operating systems. It is a command-line tool that may be difficult for non-technical users to navigate.
Here is an overview of the recovery process using TestDisk. More detailed step-by-step instructions can be found on the tool’s website.
Step 1. Install TestDisk using Homebrew.
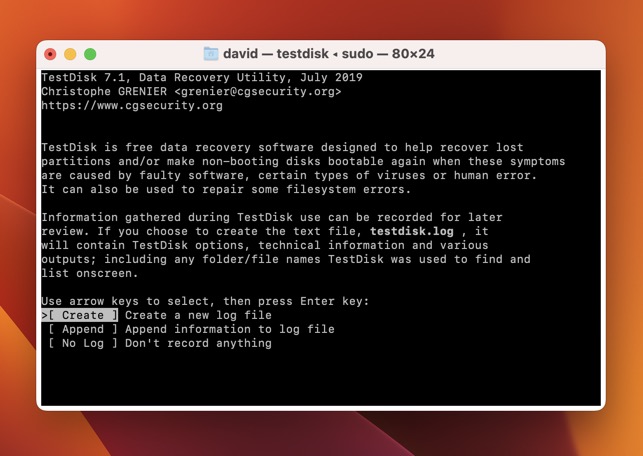
Step 2. Launch TestDisk from Terminal and choose to create a new log file.
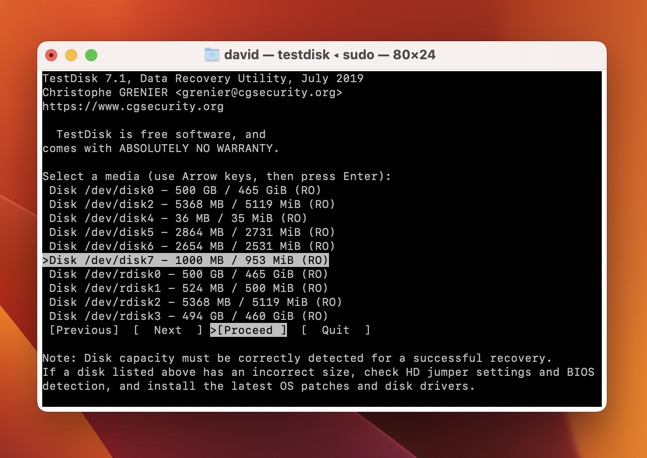
Step 3. Select the storage device you want to recover and specify the partition table type.
Step 4. Navigate to the Advanced category.
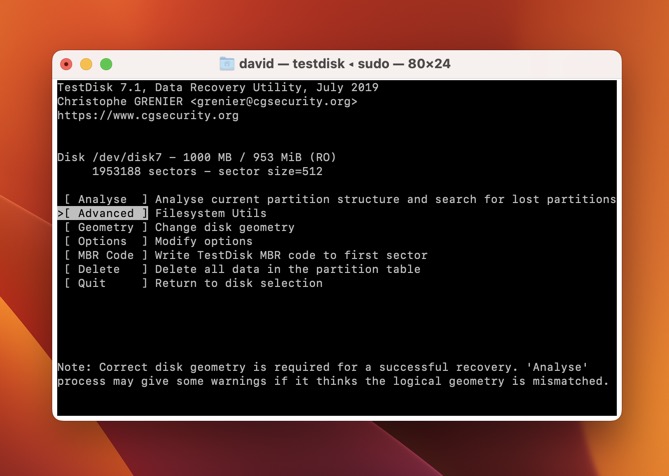
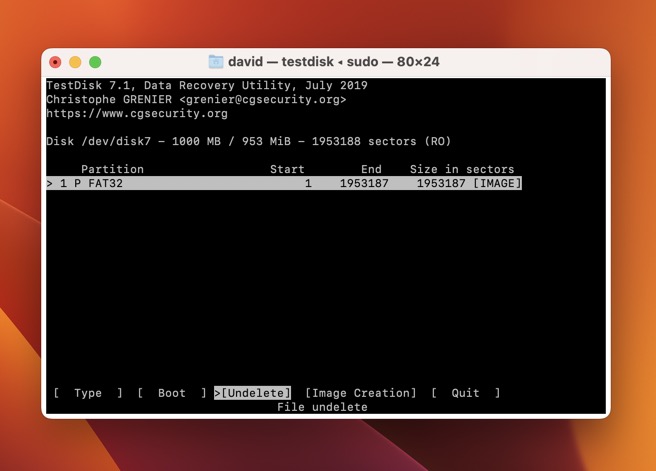
Step 5. Choose the partition where your files were located and select the Undelete option.
Step 6. Locate and select your deleted files.
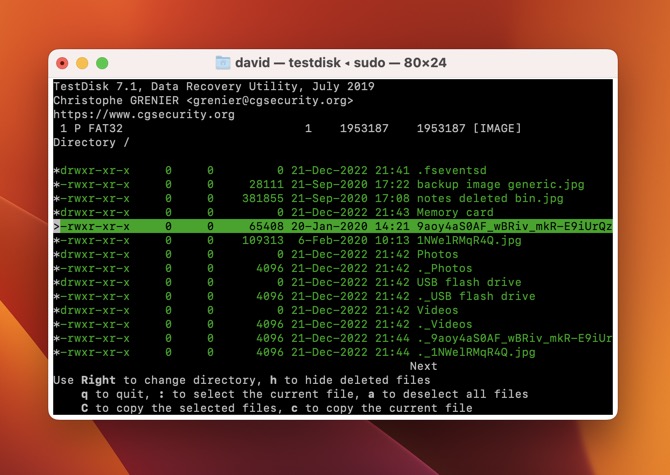
Step 7. Choose a location where recovered files will be written.
Step 8. Perform the recovery.
- Can recover permanently deleted files
- Completely free and open source
- Can recover lost partitions
- Support for all commonly used storage devices and file types
- Difficult to use
- No graphical user interface
Option 6: Use App-Specific Recovery Features
- Approximate time to recover a file: 10 seconds

- Difficulty: Very easy
- Limitations: This must be done before the files expire and are permanently deleted.
- Bulk recovery: You can recover as many recently deleted items as you like at one time.
- Location and name of recovered files: Files are named and returned to their original locations.
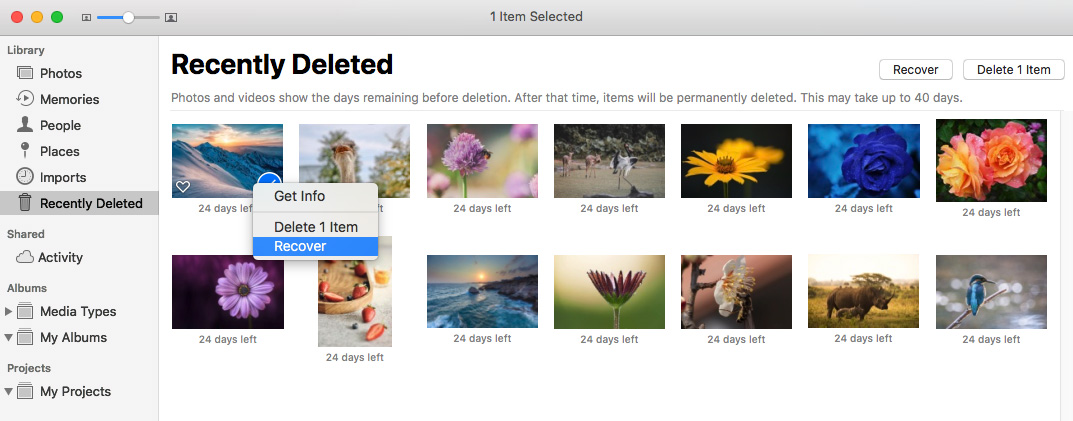
Some macOS apps, like the Photo app, store recently deleted items in a specially designated folder to enable their quick recovery. Here are the steps you should follow to recover a lost file using this method.
- Open the app.
- Select the Recently Deleted folder.
- Choose the items you want to recover.
- Click the Recover button.
- 100% reliable recovery within 30 days
- Free solution
- The recovery process is self-contained in the app
- Files are only available for 30 days after deletion
- Is only available in selected apps
Option 7: Apply to data recovery services
 Approximate time to recover a file: Multiple days for recovery as the device needs to be shipped to the service center
- Difficulty: Very easy and requires no special knowledge
- Limitations: Recovery must be done before data is overwritten on the affected device.
- Bulk recovery: Large amounts of data can be restored at once.
- Location and name of recovered files: The service should be able to recover most file names. Data will be returned on new media from where it can be copied back to its original location.
Using a data recovery service like the CleverFiles data recovery center can help you get back lost data when other options have failed. Professional data recovery experts will employ advanced hardware and software techniques to clone your damaged storage device and recover its files.
Here is an overview describing how to engage a data recovery service.
Step 1:Contact the service for an initial consultation and to obtain instructions on how to ship them your storage device.
Step 2:Ship the storage device to the recovery center.
Step 3:Upon receipt, the service will examine the device and provide the customer with a recovery price. Reliable sites will not charge you if they cannot recover your data.
Step 4:Data will be recovered and shipped back to you on new storage media.
- Reliable recovery method
- Performed by professionals with advanced software and hardware tools
- May succeed when all other recovery options have failed
- More expensive than other solutions
- Can take multiple days for recovery to be completed
Which File Types Can Be Recovered on Mac?
![]()
Using the above-described methods, you can recover just about any file type and file extension you encounter.
Here are some common file types and file extensions Mac users often want to recover:
| File Type | File Extension |
|---|---|
| Video | 3G2, AVI, CRM, FLV, M4V, MKV, MOV, MP4, MPG, OGM, RM, WEBM, WMV |
| Audio | AA, AAC, CDA, FLAC, M4A, MP3, MP2, MPA, OGA, OGG, RA, WAV, WMA |
| Images | AI, BMP, C4D, CR2, DJVU, ICO, JP2, JPG, NEF, PNG, PSD, SVG, TIFF, WMF |
| Documents | DOC, DOCX, ENL, EPUB, FB2, HTML, ICS, NUMBERS, ODT, ODS, ODP, PAGES, PPT, PPTX, QBB, RTF, TTF, XLS, XLSX, XML |
| Archives | 7Z, ARJ, CAB, DMG, ISO, JAR, MBX, PST, RAR, RDB, TAR.XZ, ZIP |
We’ve collected detailed guides on how to recover specific file types, and we encourage you to read them so that you understand the recovery process as much as possible:
- How to recover deleted videos
- How to recover Photoshop file
- How to recover deleted notes
- How to get back images
- How to restore accidentally deleted/unsaved documents
- Recover deleted files on Mac using a professional data recovery tool
How to Increase the Chances of Successful Recovery?
Unfortunately, not all attempts to recover files from Trash and other places have a good ending. Sometimes, the deleted files can’t be recovered because they’ve become overwritten, but there are also other factors that may jeopardize your recovery attempts, such as data corruption, physical damage, or user error.
The good news is that there are certain things that you can do to significantly increase the chances of successful recovery:
- ⏳ Don’t wait: The sooner you start recovering your files, the better. If you notice that an important file is missing within a few seconds after its accidental deletion, you can get it back with a single shortcut. On the other hand, recovering a file that has been deleted for more than a month may not be possible even with the best file recovery software for Mac.
- 📤 Avoid unnecessary data transfer operations: Permanently deleted files that are no longer present in Trash or an existing backup can be recovered only until they become overwritten, which is guaranteed to happen sooner rather than later if you keep writing lots of new files to the storage device. To be extra safe, you should avoid all unnecessary data transfer operations until you recover your files.
- ☣️ Eliminate the root cause of data loss: Not all files disappear because a user makes a mistake. Malware and hard drive issues are just two of many other possible causes of data loss. You should always eliminate the root cause of data loss before you begin the data recovery process, otherwise you might lose your files again as soon as you get them back.
With just these three simple tips, you should be able to get files from Trash or any other folder without much trouble.
HELP: None of the Solutions Have Worked. Is There Anything Else I Can Do?
![]() With the solutions described in this article, you should be able to recover all deleted files from healthy storage devices, including traditional spinning hard drives, modern solid-state drives, USB flash drives, and memory cards.
With the solutions described in this article, you should be able to recover all deleted files from healthy storage devices, including traditional spinning hard drives, modern solid-state drives, USB flash drives, and memory cards.
However, they can’t reliably recover files from storage devices that have suffered physical damage, which may occur when a storage device is exposed to extremely high or low temperatures, moisture, dust, or simply dropped on the floor.
In such cases, there’s zero room for DIY solutions since most attempts to repair a damaged storage device at home do more harm than good. Instead, you should use a data recovery service and let professionals with state-of-the-art equipment recover your data for you.
External Websites/Sources [Links Below] [Add Dates]
Related Articles
Data Recovery (Windows)
Issue [Data Recovery (Windows) ] Devices [Laptop, Desktop, Windows] Suggested Resolutions [See Steps Below] Windows 10 Do You Know Microsoft’s Windows File Recovery Tool? When you delete or lose some important files on your Windows 10 computer, the ...Computer Running Slow (MacOS)
Issue [Computer Running Slow (MacOS)] Devices [MacBook, Mac] Suggested Resolutions [See Steps Below] Startup disk available storage Your computer’s startup disk may not have enough free disk space. To make disk space available, you can move files to ...Reset Computer (MacBook)
Issue [ Reset Computer (MacBook) ] Devices [MacOS, MacBook, Mac] Suggested Resolutions [See Steps Below] Mac Reset Use Erase All Content and Settings This feature requires macOS Monterey or later and a Mac with Apple silicon or the Apple T2 Security ...Computer Making Strange Noises
Issue [Computer Making Strange Noises] Devices [Laptop, Desktop, Windows, MacOS, MacBook ] Suggested Resolutions [See Steps Below] 7 Reasons a computer is buzzing & how to fix it A buzzing noise coming from your computer is generally a sign of ...Computer Wont Recognize USB Device
Issue [Computer Won't Recognize USB Device] Devices [Laptop, Desktop, Windows, MacOS, Chrome OS] Suggested Resolutions [See Steps Below] Chromebook -Some USB drivers have a power switch on them. So, make sure it is not switched off position. -If you ...