Data Recovery (Windows)
Issue [Data Recovery (Windows) ]
Devices [Laptop, Desktop, Windows]
Suggested Resolutions [See Steps Below]
Windows 10
Do You Know Microsoft’s Windows File Recovery Tool?
When you delete or lose some important files on your Windows 10 computer, the first thing you think should be how to restore deleted files in Windows 10. If you still can find the files in Recycle Bin, you can directly restore them from Recycle Bin to their original location.
How to Recover Deleted Files from Recycle Bin?
- Open Recycle Bin.
- Find the file you want to restore and right-click it.
- Select Restore from the right-click menu.
However, if the files are deleted permanently, you can’t find them in Recycle Bin. If you have backed up these files previously, you can restore them from your backup. When there are no available backups, you will need to use data recovery software.
You can try Microsoft’s Windows File Recovery tool.
What Is Windows File Recovery?
Windows File Recovery is a command-line utility designed by Microsoft. You can use it to recover deleted files from a local hard disk drive, a USB flash drive, or a memory card like an SD card. This tool uses the winfr command to undelete files Windows 10. It has two modes designed for recovering files from different file systems in the Winter 2020 release. It is free and available in Windows 10 20H1 or the later versions. It doesn’t support recovering files from cloud storage and network file shares.
This tool is new. Not all of you are familiar with it. But it is useful. If you have an interest, you can read this article to learn how to use this utility to undelete files Windows 10.
Windows File Recovery is not preinstalled on your Windows 10 computer. You need to download it from Microsoft Store and then install it for further use. The following content includes how to download and install it on your computer and how to use this Microsoft file recovery tool to recover files from drives with different kinds of file systems.
How to Download and Install Windows File Recovery?
To protect your computer, you’d better download this Microsoft file recovery tool from Microsoft Store, which is a digital distribution platform owned by Microsoft.
Now, we will show you how to download and install Windows File Recovery via Microsoft Store:
1. Use Windows search to search for Microsoft Store and select the first result to open it.
2. Click the Search icon on the top-right side of Microsoft Store and use it to search for windows file recovery.
3. Click Windows File Recovery from the search result.
4. On the next page, you need to click Get to download this utility.

5. Click Install to install the tool on your computer.
6. When the installation process ends, you can click the Launch button to directly open it. If you don’t need to use it immediately, you can just close Microsoft Store and do other things you want to do.

How to Use Windows File Recovery?
Step 1: Check Whether Your Computer Supports Windows File Recovery
As mentioned above, Windows File Recovery only works in Windows 10 20H1 or the later versions of Windows 10. If you are using an earlier Windows 10 version, you can upgrade your Windows to a supported version and then use this tool, or you can use a Windows File Recovery alternative to recover lost files in Windows 10.
Recommendation: What Version of Windows Do I Have? Check Version and Build Number.
Step 2: Decide Which Mode You Should Use
Till now, Windows File Recovery has two releases: the Winter 2020 release and the Summer 2020 release. In the newest release, the Winter 2020 release, the number of the recovery modes is decreased to 2 from 3. These two recovery modes are Regular mode and Extensive mode.
Relatively speaking, the Winter 2020 release is easier to use. So, we show you how to use Windows File Recovery Winter 2020 release and its two modes to restore deleted files Windows 10.
Which mode should you use to retrieve deleted files on your Windows 10 computer? It depends on multiple elements. For example, which file system is used by the drive that you want to undelete data from, how long has the file been deleted, and how the file gets lost (the drive is formatted or corrupted).
About File System
- If it is an SD card, flash drive, or USB drive that is smaller than 4GB, it is usually formatted to FAT or exFAT.
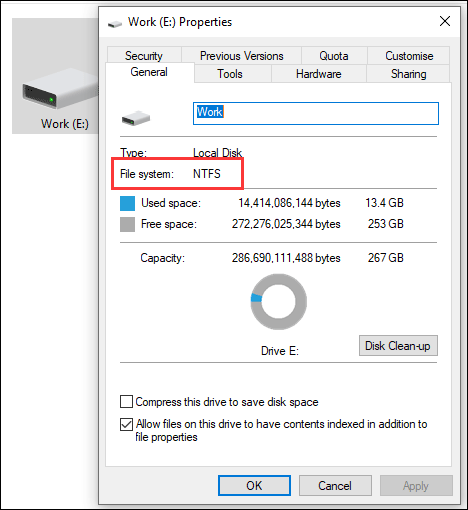
- If it is a computer hard drive, an external hard drive, flash drive, or USB drive whose capacity exceeds 4GB, it is usually formatted to NTFS.
If you are not sure which file system you are using, you can right-click that drive and then select Properties to make a confirmation.
Select a Mode
The following table can help you choose a suitable mode. However, if you are not sure, you can start with the Regular mode.
File System | Situation | The mode you should use |
NTFS | The file was deleted recently | Regular mode |
NTFS | The file was deleted a while ago | Extensive mode |
NTFS | The disk was formatted | Extensive mode |
NTFS | The disk is corrupted | Extensive mode |
FAT & exFAT | Any situation | Extensive mode |
Step 3: Use Windows File Recovery to Restore Lost Files in Windows 10
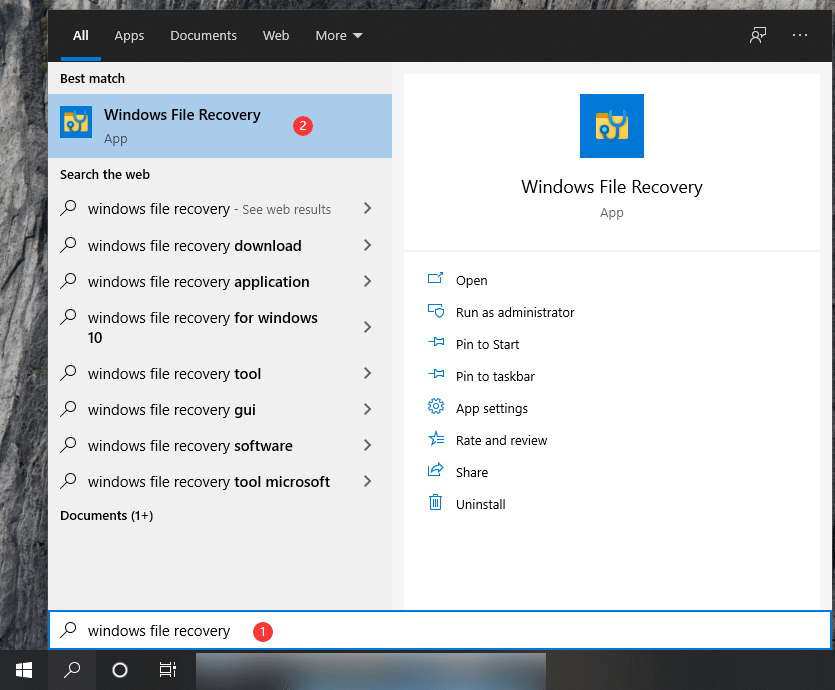
1. Click the Windows search icon to open it and type windows file recovery in the search box.
2. Select the first result to open this Microsoft Windows File Recovery tool.
3. Click Yes if you receive User Account Control.
4. The command you need to use is the following format:
winfr source-drive: destination-drive: [/mode] [/switches]
Here, you need to know that the source disk and destination disk must be different. When recovering data from the operating system drive (usually it is drive C: ), you need to use the /n <filter> switches to specify the user files or folder.
To be specific,
Use the Regular mode:
① If you want to recover files from the Documents folder on your C drive to E drive, you need to type the following command. Here, you should not forget the backslash mark at the end of the folder:
Winfr C: E: /regular /n \Users\<username>\Documents\
② If you want to recover the PDF file and Word files from your C drive to E drive, you need to use the following command:
Winfr C: E: /regular /n *.pdf /n *.docx
③ If you want to recover a file which name contain the string test from C drive to E drive, you can try this command with wildcard characters:
Winfr C: E: /regular /n *test*

Use the Extensive mode:
① Likewise, you can use the Extensive mode to recover any file with the string test in the file name with wildcard characters like this:
Winfr E: C: /extensive /n *test*

Compared with the Regular mode, this mode will take a longer time to finish the scanning and recovering process. You should wait patiently.
② To recover jpg and png photos from your Pictures folder to the recovery folder on the E drive, you can use this command:
Winfr C: E: /extensive /n \Users\<username>\Pictures\*.JPG /n\Users\<username>\Pictures\*.PNG
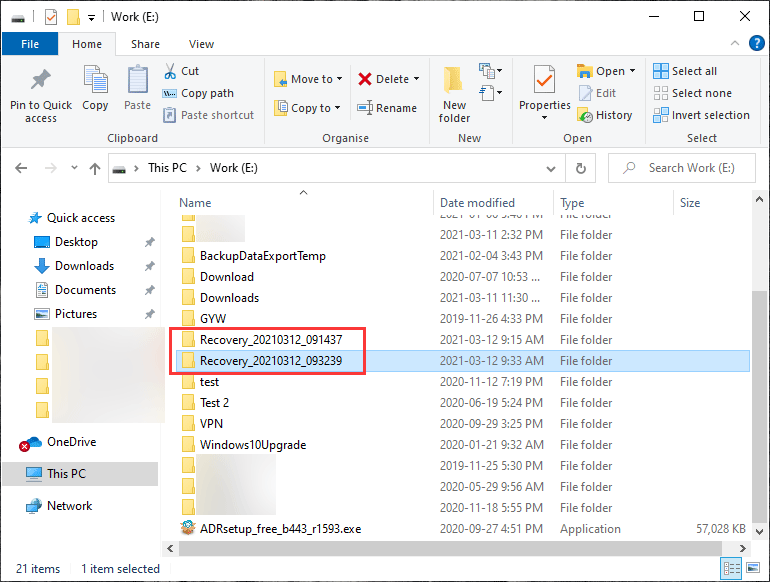
5. Windows will automatically create a recovery folder on the destination drive to save the recovered files. The folder is usually named in the format of Recovery_<date and time>.
6. When seeing Continue? (y/n) popping up in Command Prompt, you need to press the Y key on your keyboard to continue the recovering operation. You can press Ctrl+C to cancel the recovery process.
7. If you are using the Extensive mode, you may see View recovered files? (y/n) when the recovery process ends. You can press the Y key on your keyboard to directly open the recovery folder.

These are the steps to use Windows File Recovery to recover files on your Windows 10 computer. For a beginner, the command lines are not so friendly. You need to remember them and you can’t make any mistake. You can use a Windows File Recovery alternative is you want things to be easier. Here is a choice.
A Windows File Recovery Alternative
MiniTool Power Data Recovery is a free file recovery tool, which is specially designed to recover data on Windows computers. It has four recovery modes: This PC, Hard Disk Drive, Removable Disk Drive, and CD/DVD Drive. Besides, this software also supports the HFS+ file system.
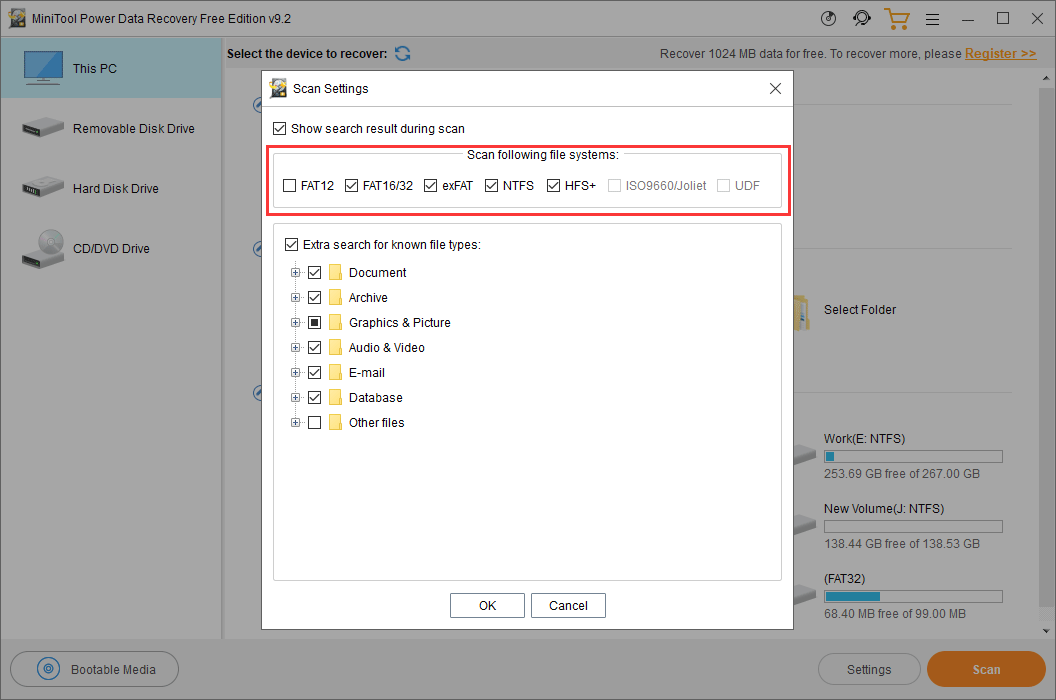
With these four modes, you can recover data from all kinds of drives like internal hard drives, external hard drives, SD cards, memory cards, USB flash drives, and more. No matter the drive is reformatted or corrupted, you can use this software to recover the lost files in it as long as they are not overwritten by new data. If your computer is unbootable, you can use the bootable edition of this software to rescue your files.
With the free edition of this software, you can recover 1GB of data without paying any cent. You can try it first and then update to a full edition if you want to undelete more files.
Unlike Windows File Recovery, you don’t need to remember the recovery commands. With some simple clicks, you can get your needed data back:
1. Download and install this software on your computer.
2. Click its shortcut to open the software.
3. Under This PC, you can select the drive you want to recover data from.
4. Click the Start button to start the scanning process.

5. When the scanning process ends, you can see the scan results.
6. Find and select the files you want to recover.
7. Click the Save button and select a suitable location to save the selected items. You should select another path rather than the original location to save files. Otherwise, the lost files may be overwritten and become unrecoverable.

With these steps, you can easily undelete your files.
Summary
If you are a professional user, you may prefer to use Microsoft’s Windows File Recovery tool to restore lost files in Windows 10. If you are an ordinary user, MiniTool Power Data Recovery should be easier to use. You can just select a suitable utility according to your situation and requirement.
Windows File Recovery Tool FAQ
External Websites/Sources [Links Below] [Add Dates]
Related Articles
Data Recovery (MacOS)
Issue [Data Recovery (MacOS) ] Devices [MacOS, MacBook, Mac] Suggested Resolutions [See Steps Below] How to Choose the Right Way of Recovering Mac Files? When deciding how to recover deleted files on Mac, you need to take into consideration the ...Reset PC (Windows)
Issue [ Reset PC (Windows) Devices [Laptop, Desktop] Suggested Resolutions [See Steps Below] PC (Windows 11) To reset your PC, go to Start > Settings > System > Recovery . Next to Reset this PC , select Reset PC. Then, select Keep my files, choose ...Windows Won't Boot
Issue [Windows Won't Boot] Devices [Laptop, Desktop, Windows] Suggested Resolutions [See Steps Below] Windows 10: Step 1: Check the Power Supply When pressing the power button on your PC, the fans spin up, indicator lights on the keyboard and ...Computer Running Slow (Windows)
Issue [Computer Running Slow (Windows) ] Devices [Laptop, Desktop] Suggested Resolutions [See Steps Below] Windows 11 & 10 If your PC is running slowly, the following suggestions might help speed things up. The tips are listed in order, so start with ...Battery Won't Charge (Laptop/Desktop)
Issue [Battery Won't Charge (Laptop) ] Devices [Laptop, MacOS, Windows] Suggested Resolutions [See Steps Below] Windows 10: Step 1: Run Windows 10 Battery Diagnostics If your battery isn’t fully charging, the first thing you can try is the Battery ...